#7 – View photos easier
By now, you’ve seen the collage-slideshow look of multiple photos in one post or update. If you don’t like how it currently renders or you simply missed the old photo viewer, you can
1) Wait for the entire picture to load.
2) Click refresh (F5) in your browser.
Here’s another secret.
Click the first picture. Then hold the left or right arrow key to view the photos in a flash! Use this to navigate hundreds of photos quickly.
You can do this for all your photos. Just go to Photos on your Timeline. Click any picture you want and then, hit the arrow key. Instant flashback!
Speaking of photos, you may also see all the photos that you liked by simply typing ‘photos liked by me.’ Click the See all (or See more) link to see all the photos you liked since joining Facebook.
Do you want to see the photos liked by any of your friends? Simply type ‘photos liked by [name of your friend]’ and the photos that particular person liked will appear in a collage.
You may unlike those pictures that are no longer relevant to you one by one, as more photos are loaded. Or, you may head on to your Timeline to see all the things you’ve liked on Facebook including posts and comments and pages and interests.
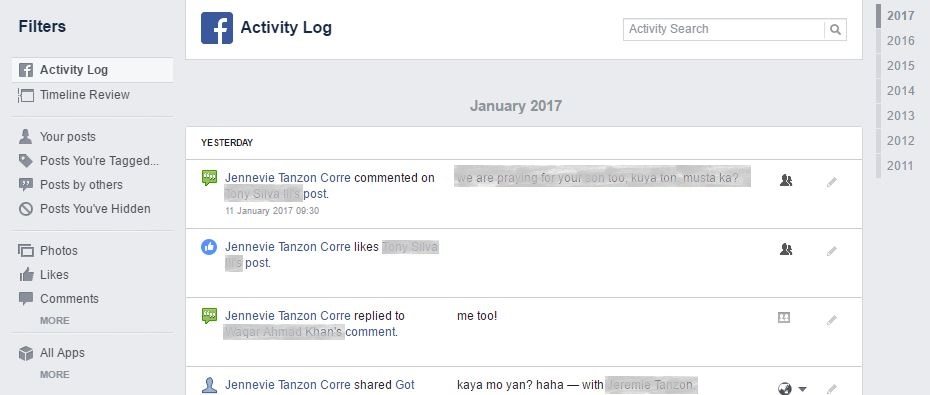
Click the View Activity Log button across your name. From there, you can explore your posts, photos, likes, comments and more. You may even filter by year or conduct an Activity Search.
#8 – Soup up your photos
On Messenger, users are allowed to draw anything or add some text on your photo.
1) Tap the photo or gallery icon. The gallery will be launched instantly.
2) Select one photo and hold over it for one to two seconds.
3) Select the pen icon to draw on the picture or the Aa icon to write on it directly.
4) Choose a color you want from the horizontal pane at the side.
5) You may click the small encircling arrow icon below to erase what you’ve written or drawn on the pic.
The Edit icon shows up when you select the photo through swiping or choose a picture from your gallery.
#9 – Upload 360 pics and vids
Immersive images are the in thing nowadays.
When viewing these videos, you can mouse over the pics and vids, or you can use your keyboard to navigate. On mobile, you simply need to pivot your device to explore all directions.
If you want to upload your own 360 pic or vid, you may use a 360 camera or your smartphone. Just capture the moment in panorama or photosphere. Upload it to Facebook afterward.
#10 – Send and receive photos and videos or take a picture
In chat and messenger, you may send photos and videos you want to share with your friends. You may send them to each friend or start a group conversation by adding friends that you would like to see the photos or videos you want to share.
1) Click the gallery icon.
2) Select the picture or pictures you want to send, and it/they will be sent automatically.
For videos, just type or copy and paste the URL in the thread. A video snippet will be loaded. Hit the Reply button. Or, you may tick the small box that says Press Enter to send so you only have to hit the Enter button to send your message.
Alternatively, you may take a picture and send it to your friend directly. Of course, the device you are using must have a built-in camera.
#11 – Send and receive documents
You can also send files by clicking the paperclip icon. Your friend will be able to download the file directly from there.
#12 – Watch live videos all over the world
Speaking of videos, perhaps you’ve seen several videos streaming live on your News Feed. It’s common nowadays. If you are fond of watching these videos, there is another way to view live videos. And you can watch these videos from strangers all over the world.
1) Go to your News Feed.
2) Click Live Video in the left navigation bar. It’s under Explore. If you can’t see the icon, click the See more link.
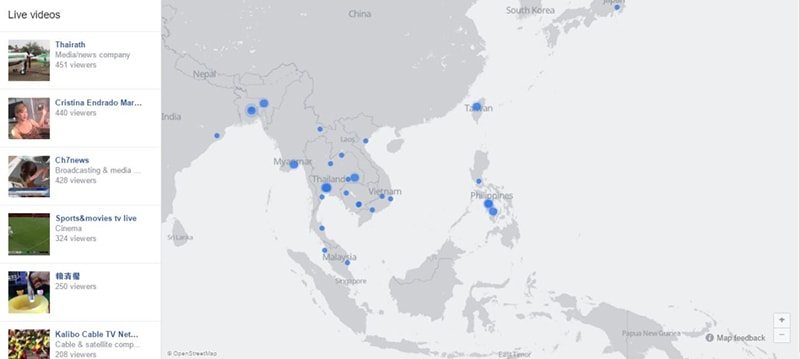
3) You will be directed to a live map of places where Facebook live videos are currently streaming.
4) Click the blue dot or any video on the left side.
If you want to broadcast a live video, you may do so through your mobile device.
1) Tap What’s on your mind.
2) Choose the Live Video icon.
3) Write a description and choose the audience for this video.
4) Tap Go Live to start broadcasting.
5) Tap Finish.
That’s it!
You can only broadcast the clip for only 30 minutes. You can also see the total number of viewers, friends who are watching and respond to comments and reactions in real-time. Cool!
Although this may not sound not so cool, you may block viewers, too. Tap the profile picture of the viewer then, just tap Block.
You may also broadcast live on a group or event. Tap Write Something or Say Something then, click the Go Live (or Live) icon.
If you receive too many Facebook live notifications, you may turn it off. When you receive the notification about the live video, click the small arrow icon to open the pull-down menu. Then, choose the Turn off notifications about live videos from…
Optionally, you may click the actual video. There’s a toggle at the top-right corner of the video where you can mute the video.


